Tactical Starship Rules
Source Tech Core pg. 166
Tactical starship encounters take place in encounter mode and function just like any other combat encounter in many ways. In a tactical starship encounter, PCs and their adversaries act in sequence, using initiative and playing out a series of rounds. Each round has turns that function the same as a normal combat encounter, with each PC having the usual number of actions and reactions.
The key difference between a tactical starship encounter and a typical combat encounter is that starship encounters take place on board the players’ starship; they use a starship map depicting the parts of their starship as well as a sensor map displaying other starships and hazards in the vicinity. When acting as crew members during a tactical starship encounter, PCs can use most of their abilities as normal, but if they want to interact with starship-scale objects on the sensor map, they’ll need to helm a battle station (such as gunnery or scanners). Starship stations grant special actions that can only be used while helming that station, but a crew member isn’t confined to a single station. A crew member might begin combat at a gunnery station, then move to the engine room to fight off boarders or fix a malfunction, then return to the gunnery station to finish off an enemy starship. Meanwhile, another crew member might spend the whole time at the pilot’s console performing desperate maneuvers to evade enemy fire!
A character-scale combat encounter might take place on board the player starship—such as if a rampaging garaggakal phases through the hull and begins stalking the crew. The starship’s battle stations won’t have any effect against the garaggakal, and a sensor map would be useless to track its movement. To change this scene to a tactical starship encounter, the same combat with the garaggakal might occur during a deep space skirmish with Aeon Guard starships, or the garaggakal’s presence might alert a nearby Hellknight patrol sworn to purge the monster at all costs—even if it means battling the crew trying to contain it!
The key difference between a tactical starship encounter and a typical combat encounter is that starship encounters take place on board the players’ starship; they use a starship map depicting the parts of their starship as well as a sensor map displaying other starships and hazards in the vicinity. When acting as crew members during a tactical starship encounter, PCs can use most of their abilities as normal, but if they want to interact with starship-scale objects on the sensor map, they’ll need to helm a battle station (such as gunnery or scanners). Starship stations grant special actions that can only be used while helming that station, but a crew member isn’t confined to a single station. A crew member might begin combat at a gunnery station, then move to the engine room to fight off boarders or fix a malfunction, then return to the gunnery station to finish off an enemy starship. Meanwhile, another crew member might spend the whole time at the pilot’s console performing desperate maneuvers to evade enemy fire!
A character-scale combat encounter might take place on board the player starship—such as if a rampaging garaggakal phases through the hull and begins stalking the crew. The starship’s battle stations won’t have any effect against the garaggakal, and a sensor map would be useless to track its movement. To change this scene to a tactical starship encounter, the same combat with the garaggakal might occur during a deep space skirmish with Aeon Guard starships, or the garaggakal’s presence might alert a nearby Hellknight patrol sworn to purge the monster at all costs—even if it means battling the crew trying to contain it!
What You'll Need
Source Tech Core pg. 166
To use tactical starship combat in your game, you'll need everything you use for a typical combat encounter, as well as:
- A starship sheet with details about the crew's starship, its customizations, and its statistics.
- A starship map depicting the player starship, such as a Starfinder Flip-Mat, a custom map from an adventure, or a map of your own creation.
- A sensor map that's easily visible to the GM and all players.
- A list of the station actions granted by the battle stations on the player starship.
- Statistics for one or more enemy starships or starship hazards
- Familiarity with the new rules for tactical starship combat, such as new conditions, terms, and traits.
Starship Sheet
Source Tech Core pg. 167
Adventurers who have decided to take to the stars on their own terms need a starship. A starship isn’t only the crew’s primary mode of transportation between planets, but it’s also their home and refuge during long journeys exploring the vast galaxy of Desna’s Path. As the crew levels up, their starship grows more powerful as well. Battle stations on higher-level starships grant additional benefits and might even grant additional upgrade slots. The crew can enhance and rebuild their starship to suit their needs without any extra cost while at a port, allowing them to experiment freely with various battle stations and upgrades. Like any adventurer in the party, the starship has a character sheet describing its capabilities and tracking its upgrades.
A player starship sheet has a similar structure to player character sheets. It lists the starship’s Hull Points, Shield Points, AC, Speed, sensor range, size, traits, and saving throw modifiers. Many of these statistics are derived from the starship frame chosen. The starship’s AC and saving throws can improve when crew members helm certain battle stations on the ship.
The starship sheet lists the number of expansion bays available on the player starship. An expansion bay is a room or deck that can house facilities such as a medical bay or leisure spaces like a holo den, which can facilitate certain downtime activities or give other boons. These facilities are listed on the sheet, along with the benefits they provide. You can find the list of expansion bays.
The starship sheet also lists the starship’s battle stations and other equipment like weapons and upgrades.
You can find a blank starship sheet in the back of this book or on paizo.com as a free PDF. While you might have one player or the GM handle the work of tracking and updating the starship’s statistics, it’s a good idea to keep a copy of the crew’s starship sheet for each player as well as for the GM so everyone knows the most up-to-date statistics, options, and other important information about the ship’s capabilities during tactical starship combat.
A player starship sheet has a similar structure to player character sheets. It lists the starship’s Hull Points, Shield Points, AC, Speed, sensor range, size, traits, and saving throw modifiers. Many of these statistics are derived from the starship frame chosen. The starship’s AC and saving throws can improve when crew members helm certain battle stations on the ship.
The starship sheet lists the number of expansion bays available on the player starship. An expansion bay is a room or deck that can house facilities such as a medical bay or leisure spaces like a holo den, which can facilitate certain downtime activities or give other boons. These facilities are listed on the sheet, along with the benefits they provide. You can find the list of expansion bays.
The starship sheet also lists the starship’s battle stations and other equipment like weapons and upgrades.
You can find a blank starship sheet in the back of this book or on paizo.com as a free PDF. While you might have one player or the GM handle the work of tracking and updating the starship’s statistics, it’s a good idea to keep a copy of the crew’s starship sheet for each player as well as for the GM so everyone knows the most up-to-date statistics, options, and other important information about the ship’s capabilities during tactical starship combat.
Starship Map
Source Tech Core pg. 167
During tactical starship combat, players represent their character's position and movements on board their starship using a battle map with a square grid, the same as any other combat encounter. Most tactical starship encounters occur on board the player starship, but they might also occur on board enemy starships.
Every crew should create a starship map indicating the position of each battle station. Each crew member typically begins starship combat helming a battle station, as determined by their exploration activity. Battle stations enable crew members to affect distant enemies detected by the starship's sensors, but sometimes, enemies board a player starship, or hazards appear on deck to represent malfunctions and other dangers. A map is essential for tracking encounters between the crew and boarding enemies or deck hazards. A player can spend every turn helming one battle station, or they can switch to another battle station during the encounter. Reasons to switch battle stations include needing a new approach against a tough enemy, not having the means to repair your malfunctioning battle station, stepping in for a teammate who goes down, or simply wanting to change things up.
Creatures and hazards might appear on the player starship. During an invasion or malfunction, the crew might choose to leave their battle stations to deal with these threats or ignore the problem until the threat comes to them. If left alone for too long, these threats can cascade into greater problems as invaders wreak havoc in an engine room or a hull breach begins to suck more and more air out from the starship's interior.
The players and the GM need to work together to build a wonderful home for the crew.
Every crew should create a starship map indicating the position of each battle station. Each crew member typically begins starship combat helming a battle station, as determined by their exploration activity. Battle stations enable crew members to affect distant enemies detected by the starship's sensors, but sometimes, enemies board a player starship, or hazards appear on deck to represent malfunctions and other dangers. A map is essential for tracking encounters between the crew and boarding enemies or deck hazards. A player can spend every turn helming one battle station, or they can switch to another battle station during the encounter. Reasons to switch battle stations include needing a new approach against a tough enemy, not having the means to repair your malfunctioning battle station, stepping in for a teammate who goes down, or simply wanting to change things up.
Creatures and hazards might appear on the player starship. During an invasion or malfunction, the crew might choose to leave their battle stations to deal with these threats or ignore the problem until the threat comes to them. If left alone for too long, these threats can cascade into greater problems as invaders wreak havoc in an engine room or a hull breach begins to suck more and more air out from the starship's interior.
The players and the GM need to work together to build a wonderful home for the crew.
Sensor Map
Source Tech Core pg. 168
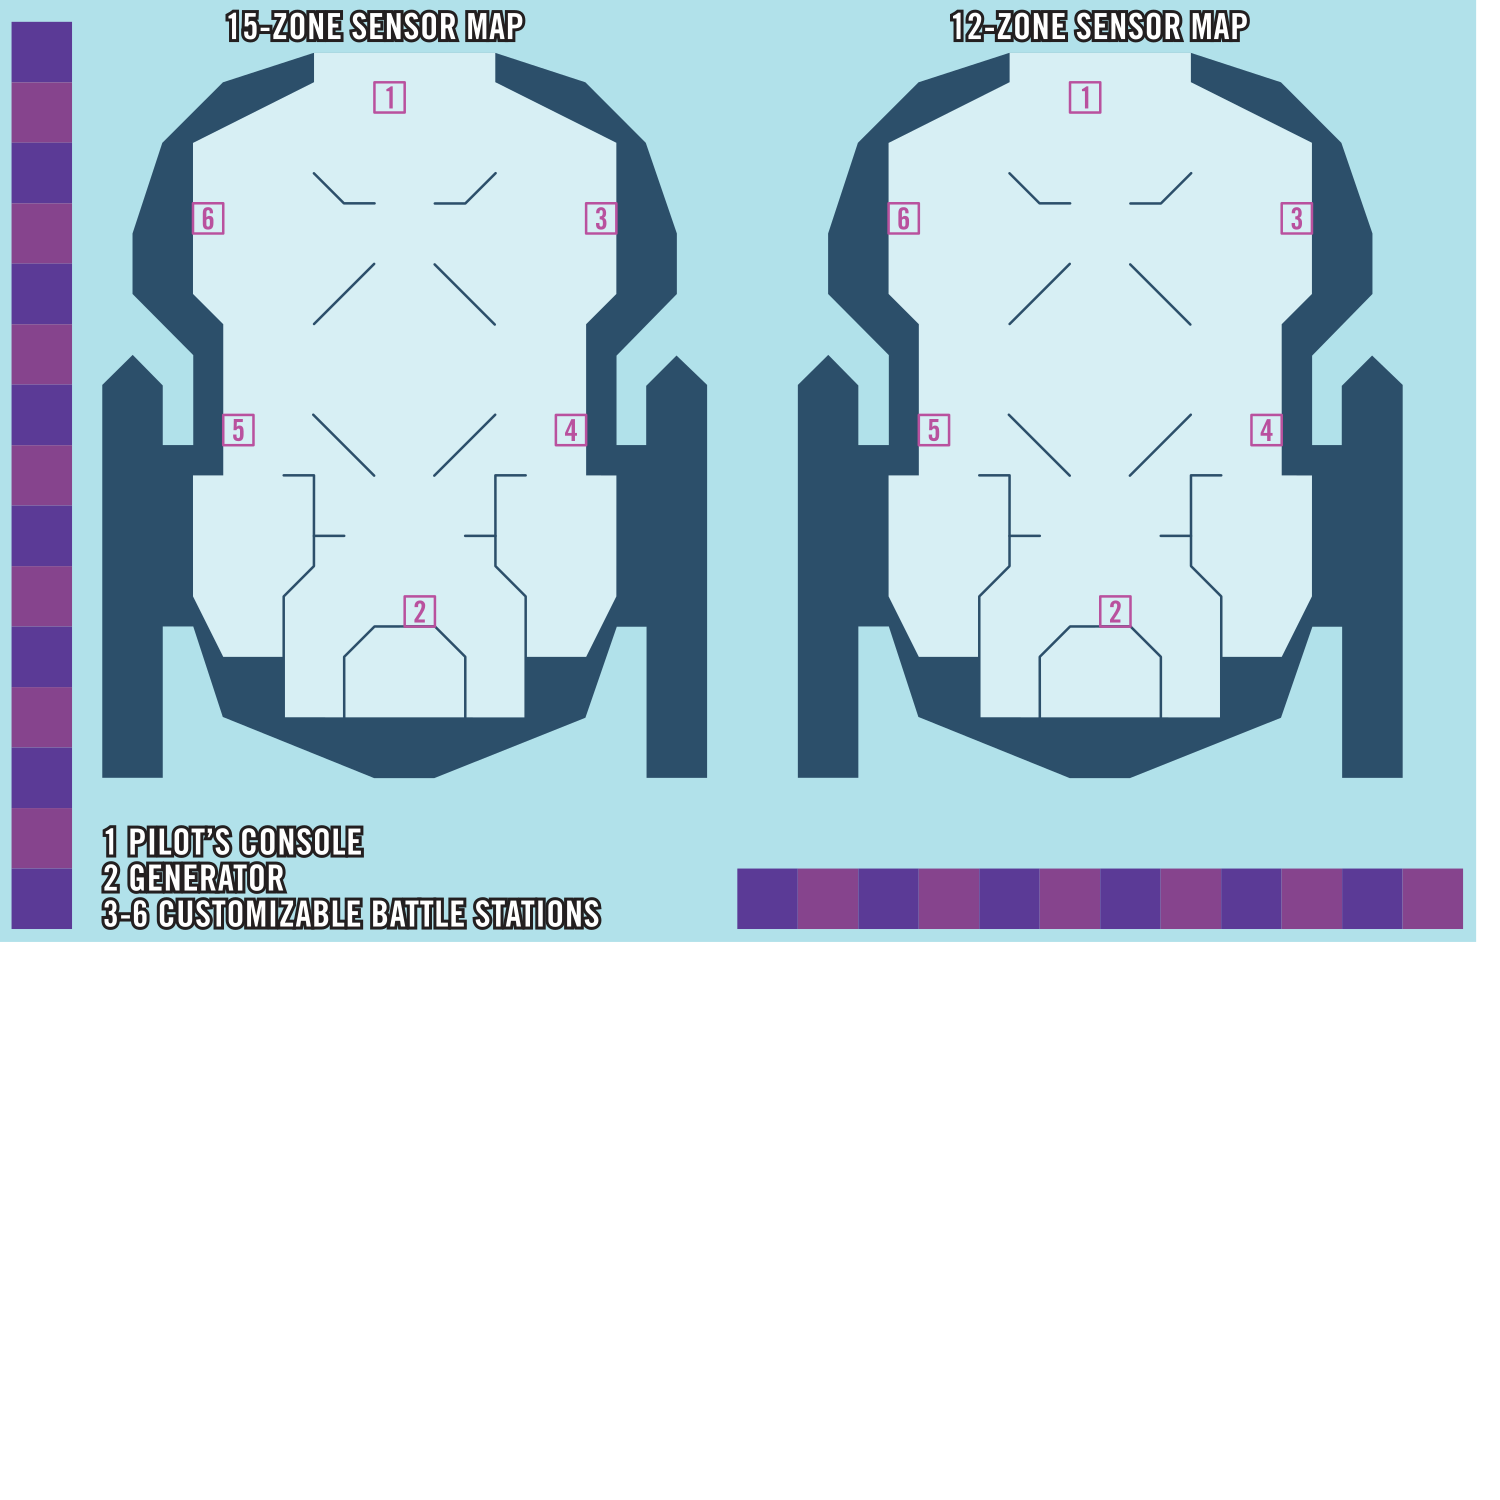
The sensor map is a map that represents the vast region of space in which an epic starship battles take place. It's separate from the map used to represent PC movement and positions on board their starship. Place the sensor map where it's visible to the GM and all players, near the map for the starship itself, so the GM and the players can see both simultaneously. The sensor map is divided into zones, which is the unit of measurement for starship abilities.
The sensor map is used to track the positions of starships and starship hazards during a tactical starship encounter.
The sensor map is used to track the positions of starships and starship hazards during a tactical starship encounter.
Tech Gear
Source Tech Core pg. 122
Many useful technological innovations, from medical items to security devices to helpful minibots, fall under the broad category of “tech gear.”
Locks
Source Tech Core pg. 123
These locks come in two varieties: physical and virtual. The physical versions are full systems that can be dismantled with successful Thievery checks or hacked using the Computers skill. Virtual locks, meanwhile, are apps installed on technological devices, such as computers and comm units. Virtual locks gain the virtual trait and cannot be dismantled with the Thievery skill, only hacked using Computers.
Minibots
Source Tech Core pg. 127
Minibots are tiny consumer constructs designed to perform specialized tasks. Their relative ease of use makes their adoption widespread across the galaxy, as they're arguably easier to use than a simple comm unit. Their cross-platform compatibility and affordability makes them popular with technology enthusiasts, who frequently upgrade and mod them to suit their personal needs. Minibots use a combination of voice registration and RFID tags, often integrated into accessories worn by their owner. They don't activate if the owner has another minibot to prevent them from crashing into one another while attempting to obey the same command at the same time. Each minibot has statistics, with additional abilities determined by the chosen type. Most minibots expend 1 battery charge every 10 minutes while activated. While all minibots include a commercial battery, it can be replaced with a new battery, even if it's a higher grade than the minibot.
Activate Minibot [two-actions] (auditory, manipulate) Requirements You have no other active minibots; Effect You touch a minibot with an RFID tag and say its registered name as it whirls to life. Once activated, a minibot has the minion trait. It obeys you to the best of its ability when you use an action to Command it. You must be within 60 feet to verbally command a minibot.
Activate Minibot [two-actions] (auditory, manipulate) Requirements You have no other active minibots; Effect You touch a minibot with an RFID tag and say its registered name as it whirls to life. Once activated, a minibot has the minion trait. It obeys you to the best of its ability when you use an action to Command it. You must be within 60 feet to verbally command a minibot.
Battle Stations
Source Tech Core pg. 168
A battle station is a part of a starship that allows crew members to tackle starship-scale threats. When a creature helms a battle station, they gain access to station actions. For example, a pilot's console grants the Boost Thrusters station action, allowing the creature helming it to move the starship in the direction of its current heading. A starship's frame determines the default battle stations, the upgrades that come installed in the default battle stations, and open battle station slots available for customization. The party can change the battle stations that are in the customizable slots during Repair Starship downtime activities. Additionally, as starships level up, battle stations gain additional slots for upgrades that can be filled to customize and personalize them. The battle stations and their upgrades are recorded on the starship sheet. The locations of the battle stations are marked on the starship map. If you mark the position of the battle stations with numbers or similar symbols, you can use the same mark on your battle station entry in your starship sheet.
A battle station can be enhanced similar to any other equipment and gains benefits depending on its grade, including the ability to equip it with station upgrades. These upgrades often grant additional abilities beyond the basic functions of a battle station. With access to many types of battle stations and station upgrades, a party of adventurers can customize their ship to their liking, making the starship into something that's especially suited to their capabilities.
Many station actions are similar to actions a character can use in combat; for example, you can Strike using the weapons in your starship's gunnery, firing its weapons against targets within range. Many character abilities interact with battle station actions; as a new example, an operative can use the Aim action to pierce cover from an asteroid and add precision damage to their gunnery Strikes against their mark. In such cases, these actions can be used in tactical starship combat the same way they can be used in regular combat. In this example, the operative can Aim a gunnery station's weapons to enhance their damage against that target, but Aim otherwise functions as usual. Or, if the gunnery has an automatic weapon equipped, a soldier can use their primary target ability to make an additional Strike against their primary target when they Auto-Fire with the gunnery.
Most station actions require a creature to helm a battle station, meaning the creature is in the battle station's square, usually an apparatus or console, and is using it.
A battle station can be enhanced similar to any other equipment and gains benefits depending on its grade, including the ability to equip it with station upgrades. These upgrades often grant additional abilities beyond the basic functions of a battle station. With access to many types of battle stations and station upgrades, a party of adventurers can customize their ship to their liking, making the starship into something that's especially suited to their capabilities.
Many station actions are similar to actions a character can use in combat; for example, you can Strike using the weapons in your starship's gunnery, firing its weapons against targets within range. Many character abilities interact with battle station actions; as a new example, an operative can use the Aim action to pierce cover from an asteroid and add precision damage to their gunnery Strikes against their mark. In such cases, these actions can be used in tactical starship combat the same way they can be used in regular combat. In this example, the operative can Aim a gunnery station's weapons to enhance their damage against that target, but Aim otherwise functions as usual. Or, if the gunnery has an automatic weapon equipped, a soldier can use their primary target ability to make an additional Strike against their primary target when they Auto-Fire with the gunnery.
Most station actions require a creature to helm a battle station, meaning the creature is in the battle station's square, usually an apparatus or console, and is using it.
Enemy Starships And Hazards
Source Tech Core pg. 169
The last thing you'll need for tactical starship combat—and certainly one of the most important considerations—is one or more enemy starships, starship hazards, or other threats. Many examples of such threats can be found here, and GM guidelines for building starship encounters can be found here.
Some tactical starship combat encounters involve creatures or hazards that appear on board the crew's starship while they're fighting enemies on their sensor map. GMs can find plenty of monsters and NPCs in Alien Core, published adventures, and other Starfinder books or create their own using the guidelines in GM Core. Some of the hazards appear on the starship map rather than the sensor map and affect characters directly. Many hazards presented in GM Core work well in starship combat.
Some tactical starship combat encounters involve creatures or hazards that appear on board the crew's starship while they're fighting enemies on their sensor map. GMs can find plenty of monsters and NPCs in Alien Core, published adventures, and other Starfinder books or create their own using the guidelines in GM Core. Some of the hazards appear on the starship map rather than the sensor map and affect characters directly. Many hazards presented in GM Core work well in starship combat.
Starship Combat Structure
Source Tech Core pg. 169
Tactical starship combat is played out in a series of rounds, just like other encounters in encounter mode. The steps of a tactical starship encounter are as follows.
Step 1: Roll initiative. The process of rolling initiative is the same as any other encounter, but crew members can choose to roll a skill associated with the battle station they're helming.
The player starship doesn't roll its own initiative, as its actions are determined by the crew, but enemy starships and hazards always roll initiative.
Step 2: Play a round. Each crew member gets three actions to use on their turn. Turns are typically spent on taking station actions and moving between stations, but if a battle station malfunctions or a boarding pod hits the hull, characters have to make some tough choices about how to use their actions!
Step 3: Begin the next round. Similar to any other combat encounter, combat continues in rounds until the GM determines the encounter has ended. Typically, this occurs when all enemy starships are defeated and all hazards are disabled, or when the player starship has been defeated.
Step 4: End the encounter. At the end of a tactical starship encounter, crew members earn experience for defeating foes and overcoming hazards just as they would for any other combat encounter. Tactical starship encounters don't necessarily need to continue until every enemy ship is destroyed; a pirate crew might surrender rather than see their ship scrapped, or a military scout might flee capture after taking heavy damage.
If the player starship is defeated instead, the GM might choose to have enemies send boarding parties, starting a new normal combat encounter.
Step 1: Roll initiative. The process of rolling initiative is the same as any other encounter, but crew members can choose to roll a skill associated with the battle station they're helming.
The player starship doesn't roll its own initiative, as its actions are determined by the crew, but enemy starships and hazards always roll initiative.
Step 2: Play a round. Each crew member gets three actions to use on their turn. Turns are typically spent on taking station actions and moving between stations, but if a battle station malfunctions or a boarding pod hits the hull, characters have to make some tough choices about how to use their actions!
Step 3: Begin the next round. Similar to any other combat encounter, combat continues in rounds until the GM determines the encounter has ended. Typically, this occurs when all enemy starships are defeated and all hazards are disabled, or when the player starship has been defeated.
Step 4: End the encounter. At the end of a tactical starship encounter, crew members earn experience for defeating foes and overcoming hazards just as they would for any other combat encounter. Tactical starship encounters don't necessarily need to continue until every enemy ship is destroyed; a pirate crew might surrender rather than see their ship scrapped, or a military scout might flee capture after taking heavy damage.
If the player starship is defeated instead, the GM might choose to have enemies send boarding parties, starting a new normal combat encounter.
New Rules
Source Tech Core pg. 170
While the structure is the same as other combat encounters, tactical starship combat introduces new rules, traits, and conditions. These rules explain how a player starship works, how starships and hazards interact on the sensor map, how starships are damaged and destroyed, and other important concepts. The following rules come up in nearly every tactical starship combat.
Helming Battle Stations
Source Tech Core pg. 170
Crew members can move around their starship's interior decks and rooms and take actions just as they normally would in a combat encounter, but if they want to challenge the threats on their sensor map, they'll need to helm a battle station and use its station actions.
To helm a battle station, a crew member must occupy its square and must have at least one free hand. A crew member can't helm the battle station if they're unconscious or otherwise incapacitated. A crew member keeps helming the battle station until they're no longer occupying the battle station's square. Only one character can helm a battle station at a time.
A character helming a station gains access to the battle station's various station actions. Battle stations often grant one or two additional effects, such as allowing a character in the pilot's console to use their Piloting DC in place of the starship's AC. Battle stations upgraded to a higher grade often grant additional station actions and benefits.
To helm a battle station, a crew member must occupy its square and must have at least one free hand. A crew member can't helm the battle station if they're unconscious or otherwise incapacitated. A crew member keeps helming the battle station until they're no longer occupying the battle station's square. Only one character can helm a battle station at a time.
A character helming a station gains access to the battle station's various station actions. Battle stations often grant one or two additional effects, such as allowing a character in the pilot's console to use their Piloting DC in place of the starship's AC. Battle stations upgraded to a higher grade often grant additional station actions and benefits.
Zones
Source Tech Core pg. 170
Distance on the sensor map is measured in zones rather than feet or squares. Zones represent distances in outer space that wouldn’t be reasonable to calculate using 5-foot squares. Unlike the typical squares of a battle map, zones are abstract; they represent approximate and relative positions of starships, hazards, and other objects in the vicinity, rather than specific distance measurements and exact locations. Any number of starships and objects can share the same zone on the sensor map. Zones are primarily used to determine whether starships’ attacks and abilities are in range of their targets. Starship weapon ranges are described in zones. For example, a weapon with a range of 1 zone can target enemies in its zone and up to 1 zone away. Starships occupying the same zone are locked in a close-up skirmish, while starships firing at one another from different zones are engaging in a long-range duel.
Whether to maneuver to a different zone is often an important decision in tactical starship combat; the pilot must consider the crew’s capabilities as well as their enemies’ weapon ranges and the proximity of features that provide cover or hide environmental hazards. Some actions require a target to be in the same zone as the starship, and other actions can be used from great distances or have different effects depending on range. For example, if a player starship has a gunnery, the crew can catch another starship off-guard by getting behind them before firing.
Whether to maneuver to a different zone is often an important decision in tactical starship combat; the pilot must consider the crew’s capabilities as well as their enemies’ weapon ranges and the proximity of features that provide cover or hide environmental hazards. Some actions require a target to be in the same zone as the starship, and other actions can be used from great distances or have different effects depending on range. For example, if a player starship has a gunnery, the crew can catch another starship off-guard by getting behind them before firing.
Starship Movement
Source Tech Core pg. 171
Just like most creatures, starships have a Speed. This Speed is measured in zones, and determines how far their starship can travel through space. The most typical way of moving a player starship is using the pilot’s console to perform the Boost Thrusters action, which can usually be done only once per round.
Heading
Source Tech Core pg. 171
A starship’s heading determines the direction it’s pointing toward on the sensor map. The GM usually determines the heading of all ships at the beginning of a starship encounter based on the circumstances that led to the encounter; if the player starship is approaching an enemy fleet, it doesn’t make sense for their starship to be facing the opposite direction! Otherwise, the crew member helming the pilot console determines the player starship’s heading at the beginning of combat. A starship changes heading when a crew member helming the pilot console uses Turn or another station action that changes the starship’s heading.
A starship is off-guard to attacks made from the opposite direction of the starship’s heading. Starships in the same zone always treat each other as being in the direction of their heading. Specific rules and actions might have different results depending on starships’ headings.
A starship is off-guard to attacks made from the opposite direction of the starship’s heading. Starships in the same zone always treat each other as being in the direction of their heading. Specific rules and actions might have different results depending on starships’ headings.
Areas On The Sensor Map
Source Tech Core pg. 171
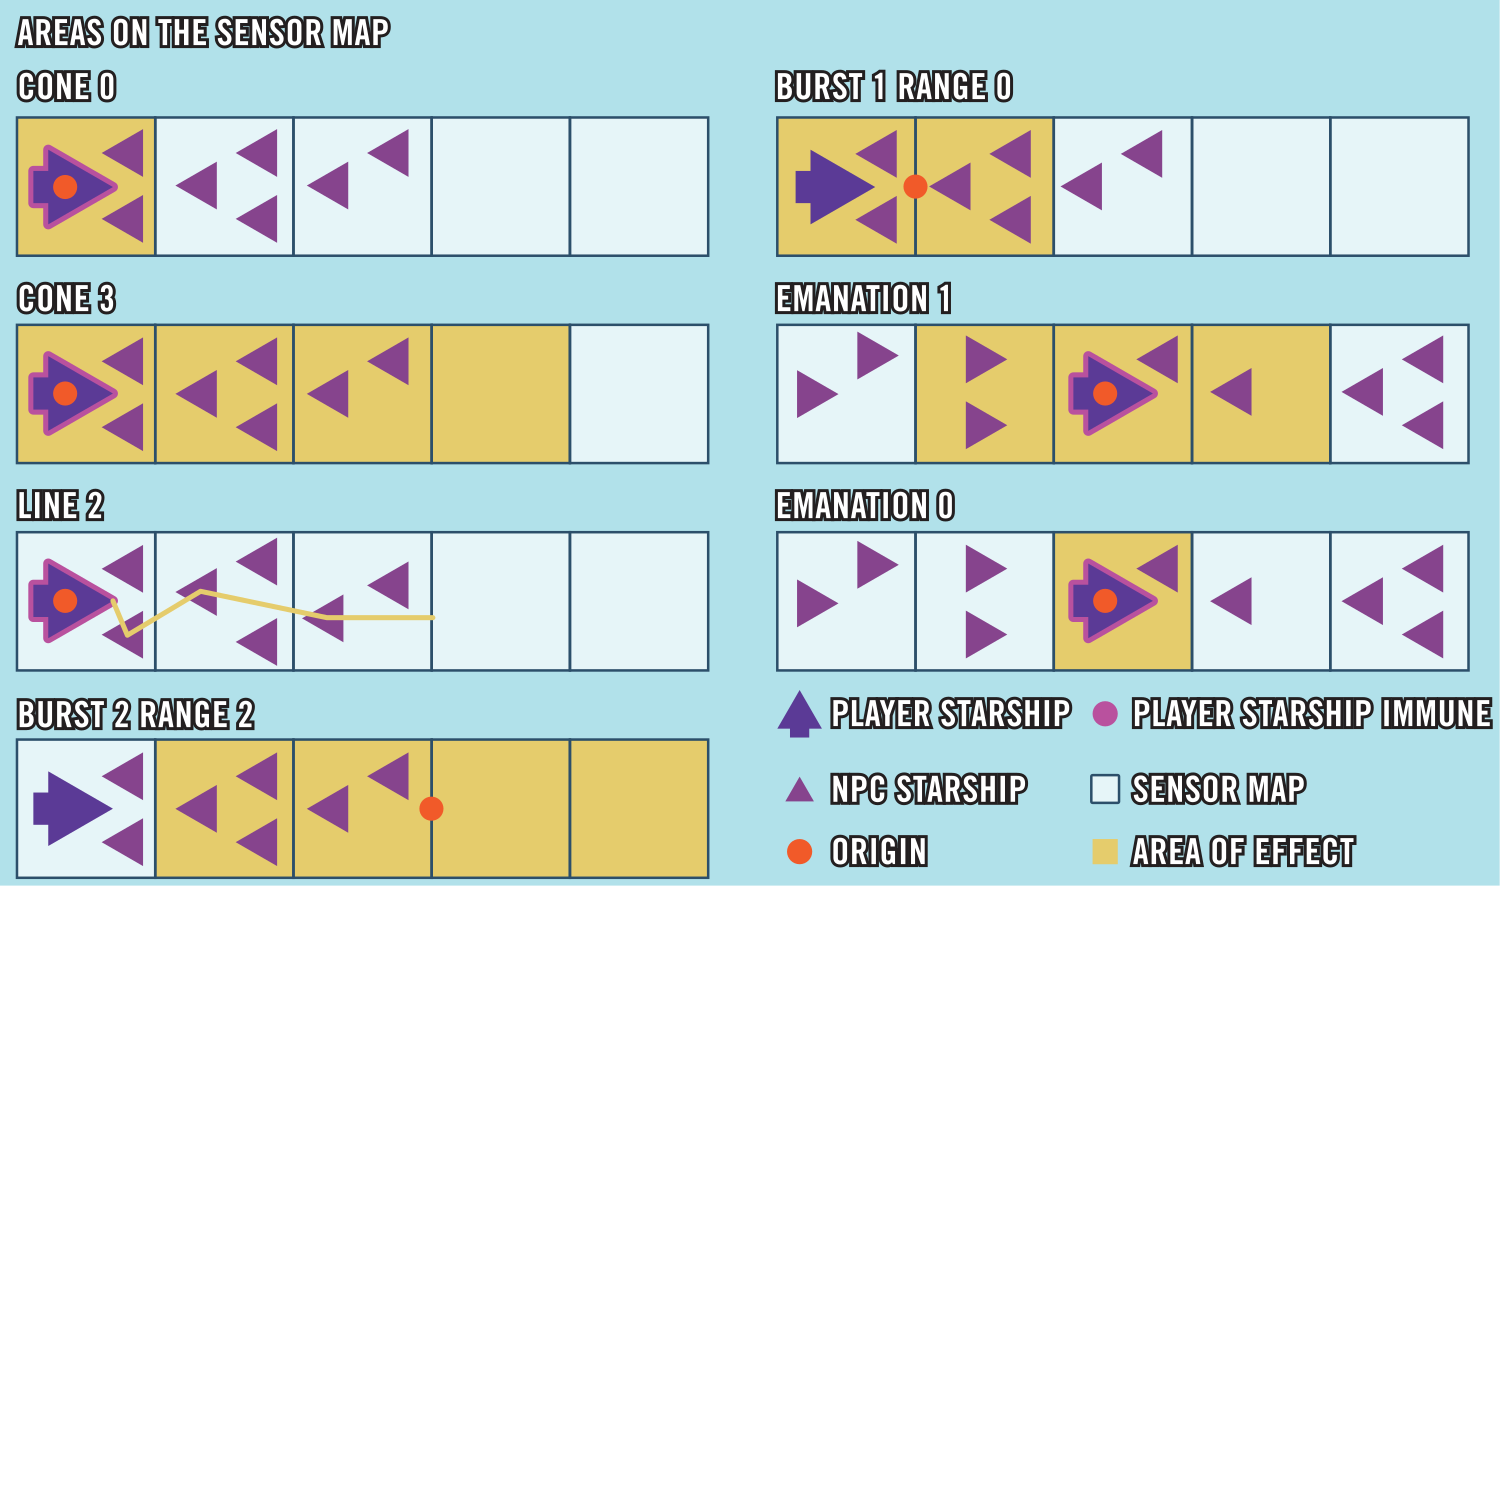
Many starship abilities and enemy attacks affect an area on the sensor map rather than a single target. Areas of effect on the sensor map are calculated similarly to those in non-starship encounters but with slight differences to account for the use of zones rather than squares.
Burst
Source Tech Core pg. 171
An effect that’s a burst originates from the line bordering two zones and extends in both directions on the sensor map for a number of zones equal to the value of the burst. A 0-zone burst instead affects a single zone in range.
Cone
Source Tech Core pg. 171
A cone starts from its origin (usually your zone) and extends in one direction for a number of zones equal to its value. A cone affects all targets in each of these zones, including your zone, but doesn’t affect the starship it originates from.
Emanation
Source Tech Core pg. 171
Emanations extend to the listed distance from your zone; for example, an emanation of 1 zone affects your starship’s zone and one zone to either side on the sensor map. An emanation with a radius of 0 zones only affects your starship’s zone and doesn’t extend to other zones.
Line
Source Tech Core pg. 171
A line starts from its origin (usually your zone) and extends in one direction for a number of zones equal to its value. A line effect can target only up to one starship in each zone it occupies, including your zone. When you use a line effect, you choose which target it affects from each zone.
Damaging Starships
Source Tech Core pg. 171
A player starship's Hull Points, Shield Points, and saving throws are determined by its frame and level. The following rules cover damaging starships and affecting them with other abilities.
Hull Points
Source Tech Core pg. 171
Instead of Hit Points, starships have Hull Points (HP). A starship’s Hull Points represent its structural integrity. When a starship takes damage, reduce its current Hull Points by a number equal to the damage dealt. Some station actions, items, and other effects, including downtime repairs, can restore Hull Points to a starship. When a starship is repaired, it regains Hull Points equal to the amount repaired, up to its maximum Hull Points.
If it’s ever unclear whether an effect referencing HP is referring to Hit Points or Hull Points, check whether the effect has the starship trait, or originates from a starship or a starship hazard. Any such effect typically affects Hull Points rather than Hit Points.
If it’s ever unclear whether an effect referencing HP is referring to Hit Points or Hull Points, check whether the effect has the starship trait, or originates from a starship or a starship hazard. Any such effect typically affects Hull Points rather than Hit Points.
Shield Points
Source Tech Core pg. 172
A starship’s Shield Points (SP) represent how much damage its shields can sustain before being depleted. Track each starship’s current and maximum Shield Points separately from its current and maximum Hull Points; when a starship takes damage, reduce its Shield Points first, then apply any remaining damage to its Hull Points.
Shield Points can’t be restored by effects that restore Hull Points, but they can be restored by other means, such as the Generate Shields action at the generator battle station. An effect can restore a starship’s Shield Points even if it has 0 Hull Points; restoring shields has no effect on a starship’s Hull Points or any other conditions resulting from hull damage, but in this case, the Shield Points might still protect the ship from taking enough damage to be destroyed (see Destroying Starships below).
Shield Points can’t be restored by effects that restore Hull Points, but they can be restored by other means, such as the Generate Shields action at the generator battle station. An effect can restore a starship’s Shield Points even if it has 0 Hull Points; restoring shields has no effect on a starship’s Hull Points or any other conditions resulting from hull damage, but in this case, the Shield Points might still protect the ship from taking enough damage to be destroyed (see Destroying Starships below).
Starship Saving Throws
Source Tech Core pg. 172
When the player starship attempts a save, any crew member can choose to roll on behalf of the starship. Some battle stations of higher grades grant an item bonus to one or more of the starship's saving throws as long as a crew member is helming that station. For example, if a crew member is helming a superior-grade pilot's console, the starship gains a +1 item bonus to Reflex saves, regardless of which crew member rolls the save for the starship. A crew member rolling the save can choose to spend one of their Hero Points to reroll, as the starship itself doesn't have its own Hero Points. Enemy and NPC starships roll saving throws much like monsters do.
Starship Immunities
Source Tech Core pg. 172
Most starships are objects that are immune to bleed, death effects, disease, drained, fatigued, paralyzed, poison, sickened, spirit, vitality, and void. Starships can never become doomed or unconscious. Unlike other objects, most starships aren't immune to mental effects since such effects have an impact on a starship's crew. Living starships often have different immunities than constructed starships, as detailed in their stat blocks. While most objects are immune to nonlethal attacks or effects, starships aren't immune to nonlethal attacks or effects by default and can be incapacitated by nonlethal attacks or effects, assuming it comes from a source that can damage the starship in the first place. It's incredibly difficult, if not impossible, for most creatures to affect starships or starship-scale creatures without a starship of their own.
Destroying Starships
Source Tech Core pg. 172
The rules governing the destruction of starships function in many ways like the death and dying rules described in Player Core, but with some key differences. When a player starship takes enough damage to reduce it to 0 Hull Points, it first becomes compromised (rather than dying), and its battle stations become malfunctioning. If the starship escapes destruction, usually by regaining Hull Points, it's wrecked (rather than wounded) until sufficiently repaired. These new rules are detailed below.
Becoming Compromised
Source Tech Core pg. 172
Starships can't be reduced to fewer than 0 Hull Points. When most non-player starships reach 0 Hull Points, they're destroyed and removed from play. Player starships aren't automatically destroyed when they reach 0 Hull Points, however. Instead, they become much more difficult to operate and are at risk of destruction.
When a player starship is reduced to 0 Hull Points:
When a player starship is reduced to 0 Hull Points:
- The starship gains the compromised 1 condition. If the effect that reduced the starship to 0 Hull Points was a critical success from the attacker or the result of the starship's critical failure, the starship gains the compromised 2 condition instead. If the starship has the wrecked condition, increase its compromised value by an amount equal to its wrecked value. If the damage was dealt by a nonlethal attack or nonlethal effect, the ship doesn't gain the compromised condition; it's instead inoperable with 0 Hull Points.
A compromised starship is heavily damaged and difficult to operate. Compromised always includes a value; if this value reaches compromised 10, the ship is destroyed. While the ship is compromised, its compromised value can increase or decrease in three ways: hull integrity checks, taking damage, and ship repairs. - Each battle station on the starship gains the malfunctioning condition. This prevents most station actions from being used, though crew members can still move around the ship, fight boarders, and gain passive benefits (if any) from helming battle stations. Most importantly, they can conduct repairs to restore function to battle stations and stop the ship from being destroyed!
- Note the initiative count when the starship became compromised. The starship enters initiative, positioned directly before the turn in which it was reduced to 0 HP. This is when it must attempt hull integrity checks in subsequent rounds, as described below. It leaves initiative if it ever loses the compromised condition.
Hull Integrity Checks
Source Tech Core pg. 173
While a starship is compromised, it must attempt a hull integrity check each round on its turn. Any crew member can attempt this check. In the case of a tie with other characters and starships acting on that initiative, attempt this hull integrity check first. This is a flat check with a DC equal to 10 + the ship’s current compromised value to see if the ship gets better or worse.
Critical SuccessThe compromised value is reduced by 2.
SuccessThe compromised value is reduced by 1.
FailureThe compromised value increases by 1.
Critical FailureThe compromised value increases by 2.
Taking Damage
Source Tech Core pg. 173
If a starship takes damage that isn’t completely mitigated (by Shield Points, for example) while it already has the compromised condition, increase its compromised condition value by 1, or by 2 if the damage came from an attacker’s critical hit or the starship’s own critical failure at a save. Additionally, each battle station on the starship gains the malfunctioning condition.
Ship Repairs
Source Tech Core pg. 173
A starship doesn't regain Hull Points automatically the way a character does by resting and must be actively repaired. It's possible to restore Hull Points to a starship during combat with certain spells (such as cosmic repairs), with station actions (such as Jump Start), or station actions granted by upgrades and drones (such as Repair Hull). Outside of combat, starship repairs are typically handled with the Emergency Repairs exploration activity; this activity not only restores Hull Points, but is also the primary method of decreasing a starship's wrecked value.
Losing the Compromised Condition
Source Tech Core pg. 173
A starship loses the compromised condition if it reaches compromised 0. A starship also loses the compromised condition if it gains 1 Hull Point or more. Any time a starship loses the compromised condition, it gains the wrecked 1 condition or increases its wrecked value by 1 if it already has that condition. Restoring Hull Points or removing the compromised condition from a starship doesn’t automatically remove the malfunctioning condition from its battle stations, though many actions that restore Hull Points, such as the Jump Start action, also remove the malfunctioning condition from battle stations.
Destruction
Source Tech Core pg. 173
When a starship is destroyed, it becomes a ruin floating aimlessly in space. The starship’s battle stations stop working and can’t be repaired. The interior of the starship has zero gravity, and creatures on board need environmental protections or other means of life support to breathe. The starship can’t regain Hull Points unless it’s returned to a port or way station for repairs. Crew members on board a starship that’s destroyed are stranded unless they installed escape pods or possess another means of escape. In some adventures, an enemy starship might explode in a devastating blast that leaves no surviving crew.
Exploration Activities
Source Tech Core pg. 174
Exploration mode occurs when a crew is traveling somewhere or investigating something on board a starship. While you’re aboard, tell the GM what you’d generally like to do on the way. This isn’t necessarily the only thing you’re doing while traveling in your starship, but what you’re busy with for the most part. This might be an appropriate time for your character to rest in preparation for more adventures, or perhaps you might be preparing for unforeseen dangers that could waylay you on your journey.
When you want to do something other than simply travel, you describe what you’re attempting to do. It isn’t necessary to go into extreme detail; you don’t need to say, “I activate the starship’s tactical-grade scanners and pinpoint the positions of all bogeys in zone 3,” for example. “I’m scanning for enemies” is sufficient.
New exploration activities are available to you while you’re traveling on board a starship. They often determine both where you are on the ship and what you can do if tactical starship combat breaks out. Many of the exploration activities available to your crew are determined by the battle stations on your starship.
These are the most common starship exploration activities.
When you want to do something other than simply travel, you describe what you’re attempting to do. It isn’t necessary to go into extreme detail; you don’t need to say, “I activate the starship’s tactical-grade scanners and pinpoint the positions of all bogeys in zone 3,” for example. “I’m scanning for enemies” is sufficient.
New exploration activities are available to you while you’re traveling on board a starship. They often determine both where you are on the ship and what you can do if tactical starship combat breaks out. Many of the exploration activities available to your crew are determined by the battle stations on your starship.
These are the most common starship exploration activities.
Class Roles In Starship Combat
Source Tech Core pg. 175
A PC's class is one of their most defining qualities, and it's important to consider each crew member's class when designing a starship for your campaign. The following guidelines can help, but every character is unique and different choices in skills and feats can radically alter their ideal play style and best roles as part of a starship crew. Archetypes and higher-level skill feats can especially change a crew member's preferred role, and the crew might decide to change their starship's battle stations, equipment, or layout to accommodate character progression.
Any class can helm any battle station, and most excel at helming more than one. It's not uncommon for a character to switch stations as battlefields evolve and enemies begin using unforeseen tactics. This is especially true when confronting starship hazards like boarding pods that can completely change the dynamics of an encounter. Crew members can find new and exciting ways to utilize their class abilities while fighting a tactical starship battle. For example, an envoy who leads from the front can use Into Position! to rush the crew to their battle stations when the starship is unexpectedly ambushed.
Naturally, any spellcaster excels when helming the magic conduit station, and when upgrading the crew's starship, they should install upgrades that are built for their class. Spellcasters should familiarize themselves with the starship's spell repository. The spells give options for dealing damage as well as for restoring Hull Points and Shield Points. Even if a spellcaster runs out of spell slots, they're likely to be as competent as any other character at most battle stations.
Any class can helm any battle station, and most excel at helming more than one. It's not uncommon for a character to switch stations as battlefields evolve and enemies begin using unforeseen tactics. This is especially true when confronting starship hazards like boarding pods that can completely change the dynamics of an encounter. Crew members can find new and exciting ways to utilize their class abilities while fighting a tactical starship battle. For example, an envoy who leads from the front can use Into Position! to rush the crew to their battle stations when the starship is unexpectedly ambushed.
Naturally, any spellcaster excels when helming the magic conduit station, and when upgrading the crew's starship, they should install upgrades that are built for their class. Spellcasters should familiarize themselves with the starship's spell repository. The spells give options for dealing damage as well as for restoring Hull Points and Shield Points. Even if a spellcaster runs out of spell slots, they're likely to be as competent as any other character at most battle stations.
Envoy
Source Tech Core pg. 175
If the person helming the scanners has Hacked the Comms of an enemy starship, envoys can bring their social skills to bear, especially if they want to use actions like Demoralize and Lie against the crew members on board other starships. Scanning also helps an envoy bolster their allies with directives, although effectively issuing directives like Get 'Em! requires the use of a drone console or gunnery to lead by example with a Strike.
An envoy with Get In There! can also help their entire crew reposition in the case of an enemy boarding their starship or if one of their crewmates needs help switching battle stations.
An envoy with Get In There! can also help their entire crew reposition in the case of an enemy boarding their starship or if one of their crewmates needs help switching battle stations.
Mechanic
Source Tech Core pg. 176
Mechanics are at home helming the generator, where they can Reposition Shield using Crafting or benefit from the mechanic generator module upgrade, but they can push practically any battle station they helm past its limit depending on the ship's equipment. The mechanic generator module allows a mechanic to add unique mods to a starship that can turn the tide of battle. The pet drone shell, mine deployment shell, and gunnery turret mount allow mechanics in starship combat to deploy their drones, mines, and turrets, respectively. Mechanics who invest in their mine exocortex might also want to helm a drone console with a pyrotechnics drone. Mechanics can Modify any gunnery weapon.
Mystic
Source Tech Core pg. 176
Mystics find their group chat particularly useful in tactical starship encounters, especially if the crew doesn't have anyone to helm the scanners at the start of an encounter. They excel at helming the magic conduit, where they can heal both the crew and starship using their own abilities and a mystic magic module upgrade.
Operative
Source Tech Core pg. 176
Operatives are excellent gunners and drone operators because they can Aim for an enemy's vital points to score extra damage with each hit. Note that an operative can Aim at any starship within the starship's sensor range. A dexterous operative pilot can drastically improve their starship's defenses or wield a gunnery weapon with unmatched skill.
Solarian
Source Tech Core pg. 176
Solarians make great gunners, especially when they use a starship weapon crystal to unleash their solar flare attack as a starship weapon. Solarian pilots can equip solar generator crystals to attune a starship with their stellar power. They're fantastic mobile defenders whenever their starship gets boarded, although this role isn't recommended if the solarian is also helming the pilot's console.
Soldier
Source Tech Core pg. 176
Soldiers shine while helming gunnery stations equipped with Auto-Fire and Area Fire weapons. They're stalwart defenders in boarding situations, suppressing enemies and soaking damage as the other crew members focus on taking out the enemy starships. A soldier might also hop in the drone console station and take a drone with a shield protocol installed out for a spin.
Technomancer
Source Tech Core pg. 176
Technomancers can use many of their spells and abilities while helming a gunnery station, and those fluent in the DPS++ programming language can overclock a gunnery weapon. Technomancers with a high proficiency in Computers might sometimes helm the scanners to shut down enemies with Target Lock and Hack Battle Station. A technomancer magic module is a great choice for technomancers when helming a magic conduit station.
Witchwarper
Source Tech Core pg. 176
Witchwarpers need a witchwarper magic module upgrade to use their quantum field in starship combat, although slowing down a boarding party is also an effective use of their reality-warping powers. Witchwarpers masterfully helm the magic conduit station, but precogs might prefer helming the pilot's station given their high proficiency in the skill. A witchwarper with Intelligence as their primary attribute could also excel at helming the generator.
Example Of Starship Combat
Source Tech Core pg. 176
The following is an example of how tactical starship combat plays out. In this adventure, Aras is the GM. Dustin is playing Chk Chk, a moody shirren mystic; Jenny is playing Navasi, a roguish human envoy; Jessica is playing Iseph, a quiet android operative; and Mike is playing Obozaya, a gruff vesk soldier. The party is investigating a distress signal from a small, supposedly abandoned mining colony on an asteroid. Aras: The distress signal is coming from an asteroid a few hours of travel away from your current location. Are you doing anything as your starship slips through the void toward your destination?
Obozaya (Mike): “Time to Lock and Load.” I'm counting our ammunition in the gunnery.
Chk Chk (Dustin): “Let's see what secrets the void holds.” I'm Scanning for Magic. Do I feel anything through the magic conduit? Scan for Magic allows a character to detect the presence or absence of magic within the starship's sensor range much like the spell detect magic.
Aras: Nothing—for now, at least. Iseph (Jessica): I'm Flying the Ship. As always. I want to Boost Thrusters to get the starship away from all the rocks floating out here.
Navasi (Jenny): Chk Chk has magic covered, so I'll Scan our Surroundings for everything else. There's a hazard on the sensor map, so Aras rolls a secret check for Navasi to notice it. She fails to notice the tachyon burst, but it isn't the only danger.
Aras: The sensors ping, and a surge of divine rage blasts the magic conduit. A massive, purple vessel looms in the sensors. It's an ambush—roll for initiative!
Aras reveals the sensor map, placing an Azlanti Sovereign Dominator four zones behind the player starship. Everyone rolls Perception for their initiative. Jessica gets a total of 22. Jenny rolls 16, Mike rolls 10, and Dustin gets 14. Aras rolls for the Dominator and gets a 21, then records the initiative order from highest to lowest. Thanks to their choice of exploration activities, everyone but Chk Chk can take a special free action when they roll initiative. Since she was Locking and Loading, Obozaya can Lock On to the Dominator to get a bonus on her first attack. Iseph gets to Evade, granting their starship a +1 circumstance bonus to its AC until their first turn. Navasi can Scan Target, attempting a Computers check against the Dominator's Will DC. Jenny rolls a 26. The Sovereign Dominator has a Will DC of 27. The Scan Target fails, so Navasi still learns about the Dominator's model name and its battle stations—a generator, a gunnery, a pilot's console, and scanners—but she can identify only one of the battle stations, allowing the crew to target it with other actions later to potentially cause it to become malfunctioning.
Navasi (Jenny): I'll identify the gunnery. “Obo, try to take out their guns!” Aras: That'll have to wait—Iseph's up first.
Iseph (Jessica): Got it. I'll Change Heading with my first action, then Juke with my second.
Jessica rolls a 28 total on her Piloting check to Juke, which beats the Dominator's Perception DC of 27. With a success, the Dominator is off-guard to the player starship for 1 round.
Iseph (Jessica): “We've got them right where we want them.” I'll use my third action to Evade again.
Aras: You'll need that AC bonus—it's the Azlanti starship's turn. It Boosts Thrusters to get you in range, then hits you with a beam of amethyst energy. Someone roll a Will save!
Mike rolls a 9 and adds the starship's Will modifier of +12, for a total of 21—a failure against the Dominator's Lissala's Eye save DC of 23. With that failure, the player starship is now off-guard to all attacks from Azlanti starships for 1 round.
Aras: Finally, the enemy starship fires on you with a bolt of electricity.
Aras rolls a 34 for the Dominator's Strike, which is a critical hit on the starship's AC of 24 for a whopping 35 electricity damage. The player starship's 20 Shield Points are taken out instantly, and the remaining 15 damage is dealt to its Hull Points. The electrical discharge also triggers the tachyon burst hazard. The starship critically fails this time, causing the generator to become malfunctioning.
Navasi (Jenny): “I'd better fix that if we want to get our shields back online!” I Stride from the scanners to the generator, and I rolled a 17 on my Computers check to repair it.
Navasi needs to helm the generator to repair it, so she must Stride twice to reach its location on the starship map. The DC to repair a malfunctioning battle station is 15, so her 17 succeeds.
Aras: The generator buzzes back to life. You can use it to Generate Shields next turn. Chk Chk, you're up.
Chk Chk (Dustin): “Embrace the pain. I'll hold us together for now.” I use a 1st-rank spell slot to cast cosmic fortification from the magic conduit, then a 3rd-rank slot for cosmic bombardment to return fire.
Chk Chk can cast starship spells using his own spell slots while helming the magic conduit. Cosmic fortification restores a total of 7 Shield Points to the starship, and cosmic bombardment deals a total of 16 force damage to the Sovereign Dominator without requiring any checks.
Aras: The barrage of divine missiles leaves the Azlanti ship's shields battered and barely intact.
Obozaya (Mike): “Time to finish the job!” I'll Target Battle Station—choosing the gunnery Navasi pointed out, obviously—then Area Fire with our farseeker missiles.
Since Navasi's Scan Target identified the Dominator's gunnery, Obozaya can target it. Thanks to Obozaya's primary target ability, she first Strikes the Dominator as a free action, rolling a 25—a hit! The Dominator takes a total of 17 piercing damage, tearing through the rest of its shields and taking 1 Hull Point damage. Since Obozaya used Target Battle Station and the Strike dealt Hull Point damage, the Dominator's gunnery is malfunctioning. The Dominator rolls a 21 on its Reflex save against the Area Fire—a failure—and takes another 10 piercing damage.
Aras: The mighty Azlanti warship looks seriously battered as your missiles explode all around it. Its shields and guns are both down—this ambush probably isn't going the way that crew had hoped! But what's that seven-sided portal materializing at the edge of your sensors? Uh oh, it looks like Azlanti reinforcements have arrived!
This marks the end of the first round of combat. The second round moves back to the top of the initiative order with Iseph's turn, ready to press their advantage before more foes show up. Now, it's your turn…
Obozaya (Mike): “Time to Lock and Load.” I'm counting our ammunition in the gunnery.
Chk Chk (Dustin): “Let's see what secrets the void holds.” I'm Scanning for Magic. Do I feel anything through the magic conduit? Scan for Magic allows a character to detect the presence or absence of magic within the starship's sensor range much like the spell detect magic.
Aras: Nothing—for now, at least. Iseph (Jessica): I'm Flying the Ship. As always. I want to Boost Thrusters to get the starship away from all the rocks floating out here.
Navasi (Jenny): Chk Chk has magic covered, so I'll Scan our Surroundings for everything else. There's a hazard on the sensor map, so Aras rolls a secret check for Navasi to notice it. She fails to notice the tachyon burst, but it isn't the only danger.
Aras: The sensors ping, and a surge of divine rage blasts the magic conduit. A massive, purple vessel looms in the sensors. It's an ambush—roll for initiative!
Aras reveals the sensor map, placing an Azlanti Sovereign Dominator four zones behind the player starship. Everyone rolls Perception for their initiative. Jessica gets a total of 22. Jenny rolls 16, Mike rolls 10, and Dustin gets 14. Aras rolls for the Dominator and gets a 21, then records the initiative order from highest to lowest. Thanks to their choice of exploration activities, everyone but Chk Chk can take a special free action when they roll initiative. Since she was Locking and Loading, Obozaya can Lock On to the Dominator to get a bonus on her first attack. Iseph gets to Evade, granting their starship a +1 circumstance bonus to its AC until their first turn. Navasi can Scan Target, attempting a Computers check against the Dominator's Will DC. Jenny rolls a 26. The Sovereign Dominator has a Will DC of 27. The Scan Target fails, so Navasi still learns about the Dominator's model name and its battle stations—a generator, a gunnery, a pilot's console, and scanners—but she can identify only one of the battle stations, allowing the crew to target it with other actions later to potentially cause it to become malfunctioning.
Navasi (Jenny): I'll identify the gunnery. “Obo, try to take out their guns!” Aras: That'll have to wait—Iseph's up first.
Iseph (Jessica): Got it. I'll Change Heading with my first action, then Juke with my second.
Jessica rolls a 28 total on her Piloting check to Juke, which beats the Dominator's Perception DC of 27. With a success, the Dominator is off-guard to the player starship for 1 round.
Iseph (Jessica): “We've got them right where we want them.” I'll use my third action to Evade again.
Aras: You'll need that AC bonus—it's the Azlanti starship's turn. It Boosts Thrusters to get you in range, then hits you with a beam of amethyst energy. Someone roll a Will save!
Mike rolls a 9 and adds the starship's Will modifier of +12, for a total of 21—a failure against the Dominator's Lissala's Eye save DC of 23. With that failure, the player starship is now off-guard to all attacks from Azlanti starships for 1 round.
Aras: Finally, the enemy starship fires on you with a bolt of electricity.
Aras rolls a 34 for the Dominator's Strike, which is a critical hit on the starship's AC of 24 for a whopping 35 electricity damage. The player starship's 20 Shield Points are taken out instantly, and the remaining 15 damage is dealt to its Hull Points. The electrical discharge also triggers the tachyon burst hazard. The starship critically fails this time, causing the generator to become malfunctioning.
Navasi (Jenny): “I'd better fix that if we want to get our shields back online!” I Stride from the scanners to the generator, and I rolled a 17 on my Computers check to repair it.
Navasi needs to helm the generator to repair it, so she must Stride twice to reach its location on the starship map. The DC to repair a malfunctioning battle station is 15, so her 17 succeeds.
Aras: The generator buzzes back to life. You can use it to Generate Shields next turn. Chk Chk, you're up.
Chk Chk (Dustin): “Embrace the pain. I'll hold us together for now.” I use a 1st-rank spell slot to cast cosmic fortification from the magic conduit, then a 3rd-rank slot for cosmic bombardment to return fire.
Chk Chk can cast starship spells using his own spell slots while helming the magic conduit. Cosmic fortification restores a total of 7 Shield Points to the starship, and cosmic bombardment deals a total of 16 force damage to the Sovereign Dominator without requiring any checks.
Aras: The barrage of divine missiles leaves the Azlanti ship's shields battered and barely intact.
Obozaya (Mike): “Time to finish the job!” I'll Target Battle Station—choosing the gunnery Navasi pointed out, obviously—then Area Fire with our farseeker missiles.
Since Navasi's Scan Target identified the Dominator's gunnery, Obozaya can target it. Thanks to Obozaya's primary target ability, she first Strikes the Dominator as a free action, rolling a 25—a hit! The Dominator takes a total of 17 piercing damage, tearing through the rest of its shields and taking 1 Hull Point damage. Since Obozaya used Target Battle Station and the Strike dealt Hull Point damage, the Dominator's gunnery is malfunctioning. The Dominator rolls a 21 on its Reflex save against the Area Fire—a failure—and takes another 10 piercing damage.
Aras: The mighty Azlanti warship looks seriously battered as your missiles explode all around it. Its shields and guns are both down—this ambush probably isn't going the way that crew had hoped! But what's that seven-sided portal materializing at the edge of your sensors? Uh oh, it looks like Azlanti reinforcements have arrived!
This marks the end of the first round of combat. The second round moves back to the top of the initiative order with Iseph's turn, ready to press their advantage before more foes show up. Now, it's your turn…